In part one of this three part series, we gave some background of the Veeam VHR history and it’s transition from utilizing Ubuntu Linux Server LTS to Rocky Linux, as well as the hardware that we’ll be utilizing to support our VHR. And as a reminder, while the VHR does have support, it’s currently classified under Veeam’s Experimental Support Statement.
Downloading and Deploying the VHR ISO
The first step of course is to download the VHR ISO. It can now be found in the my.veeam.com Customer Portal under Additional Downloads > Extensions and Other > Veeam Hardened Repository ISO. The ISO is intended to be deployed to a physical server as utilizing a VM is possible, but opens up the angle of attack of having console access if your virtual environment was breached. Obviously you should get better performance from a physical server in most cases as well.
After Downloading the ISO, attach it to your server and prepare to deploy! During the boot process, we’ll see all of the normal GRUB boot screen and services starting. If all is well, you’ll briefly notice Anaconda start and the preinstall script run and discover your two storage devices. In my case, this is the 480GB RAID 1 BOSS volume for the OS, as well as the larger 78TB RAID 5 volume for the backup repository. Note that most volumes must be at least 100GB.


You’ll then be presented with the Rocky Linux 9 installation GUI. While the Installation Destination is prefilled (the smaller volume for the OS, the larger for the repository), you’ll want to start with the Network & Host Name. If you haven’t already configured your switch ports, do this and then enter the network configuration. The reason we go straight to the Network Configuration is that you’ll have a hard time setting the date and time without network connectivity if you plan on using a NTP server.

In my case, we a few options. We have the Dell IDRAC interface which is of course useless to us, but there is also the integrated Broadcom 1Gb LOM ports and the 10Gb/25Gb OCP NIC ports. Because I’m running two ports, one to each of my top of rack switches, if reliable, the best performance is going to come by bonding these ports using the 802.3ad bonding (Mode 4) but note that this does require configuring LACP/Port Channels on your switch(s). If you can’t configure Mode 4 on your switch and need to use a switch-independent mode, the general consensus among the Veeam Community is that the next best bet would be to use Adaptive load balancing (balance-alb or Mode 6). If all is configured properly and the network ports are plugged in, you should see that the interfaces are connected or connecting with a nice icon indicating as such.

Click the Plus to create a new network interface, and then select Bond and click the Add button.

On the bonding screen, give your bonded connection a name, select the 802.3ad mode (or the mode of your choosing), and then select Add to select the interfaces the bond is going to use.

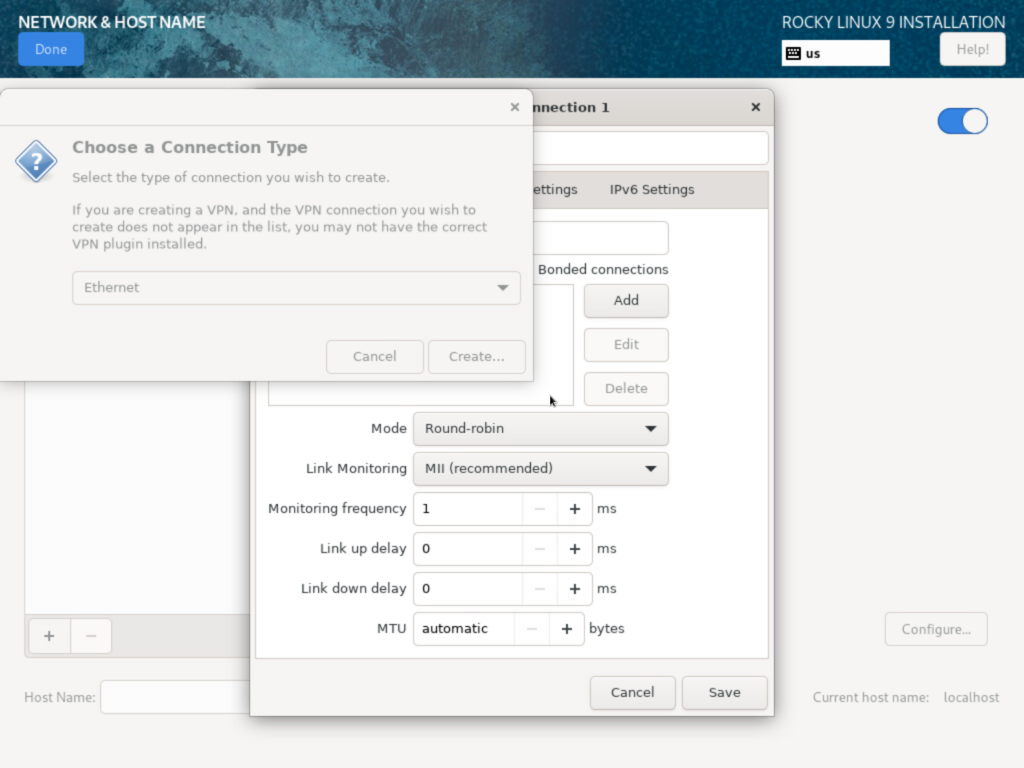
One quick thing to note is that when selecting the interfaces for bonding, you’ll be prompted to select what type of interface. In my case, the drop-down menu to select the interface type was disabled as seen below, as were any buttons aside from the X in the corner. The VHR experiences this issue because it’s actually a Rocky Linux installer bug that is carried over from the OS. What I found to work best is to click and drag the dialog box to the side a bit by the title bar and then everything becomes clickable. I’ve also had success just clicking anywhere on the window that would be outside of the bonding menu behind it. I’ve also occasionally experienced the same issue after selecting the connection type where I was unable to select the interface until I clicked outside of the bonding window behind it (which seems to occur if I misclick the connection type window a couple times before it is enabled and I’m able to select Create. It’s a minor but nuisance bug, and your mileage may vary. In my case, I need to select an ethernet interface, after which I’m presented with the window to select which ethernet interface I want to add to the bonded connection. If desired, you can set a connection name for the interface, but I left mine as the default. Select Save to select the bond, and then repeat for your second interface.


With all of the desired interfaces selected, validate that your bonding mode hasn’t changed. I will say that Rocky Linux installer as I noted above and I had to select it a couple times as I tested things out and figured out how to configure bonding as well as the nuances of the Rocky Linux installer interface. Then select the IPv4 settings tab so that we can assign an IP to our bonded interface.

On the IPv4 Settings, supply your IP address, Subnet mask using either xxx.xxx.xxx.xxx or CIDR notation, gateway, DNS servers and search domains as applicable.

Once Saved, you’ll find your bonded interface and with some luck, all will be connected. You may need to enter your host name and select apply, but in my case, because I already had a DNS entry created for the server, it resolved the hostname and automatically applied it. Click the Done Button to return to the main installation menu.

Next I selected my Keyboard Layout. Nothing really for me to do here as English (US) was selected by default and is what I’ll be using.

Next I selected the Date & Time option so that I could configure my Time Zone and NTP server. In my case, I’m nearest Chicago. I also selected the 24-hour time format which I generally prefer and then selected the gear button next to Network Time to enter my NTP configuration.

While time.nist.gov is the default selection, I prefer to use pool.ntp.org. Simply enter your server, select any additional checkboxes, in this case, “This URL refers to a pool of NTP servers” in this case, and click the plus button. In testing, I also realized that I could select my local domain (domainname.local) to utilize my local domain controllers as a pool as well. I also unchecked the “use” box the nist.gov entry to have it removed, and then selected OK.

For the heck of it, I did select the Installation Destination, but for now at least, this is preselected and disabled by the preinstallation scripts that Veeam executed during bootup. In this case, select the return button to go back to the main menu since no changes were made.

Now that all options have been selected, click the “Begin Installation” button to begin deploying the OS and enjoy the status updates while the installation environment is setup, the OS is deployed and the filesystem is created as specified by the VHR installation script. Once the installation is complete, click the Reboot System button, remove your installation media and boot the new deployed VHR.


Boot the VHR and you will be presented with the Veeam Hardened Repository menu. A sharp eye will notice in this case that the displayed IP address is not what I configured which I later realized was the IP of the Dell IDRAC interface. I later disabled the IDRAC interface via the TUI and you’ll notice on a later screenshot that the IP address has changed to the correct IP assigned to the bonded interface.


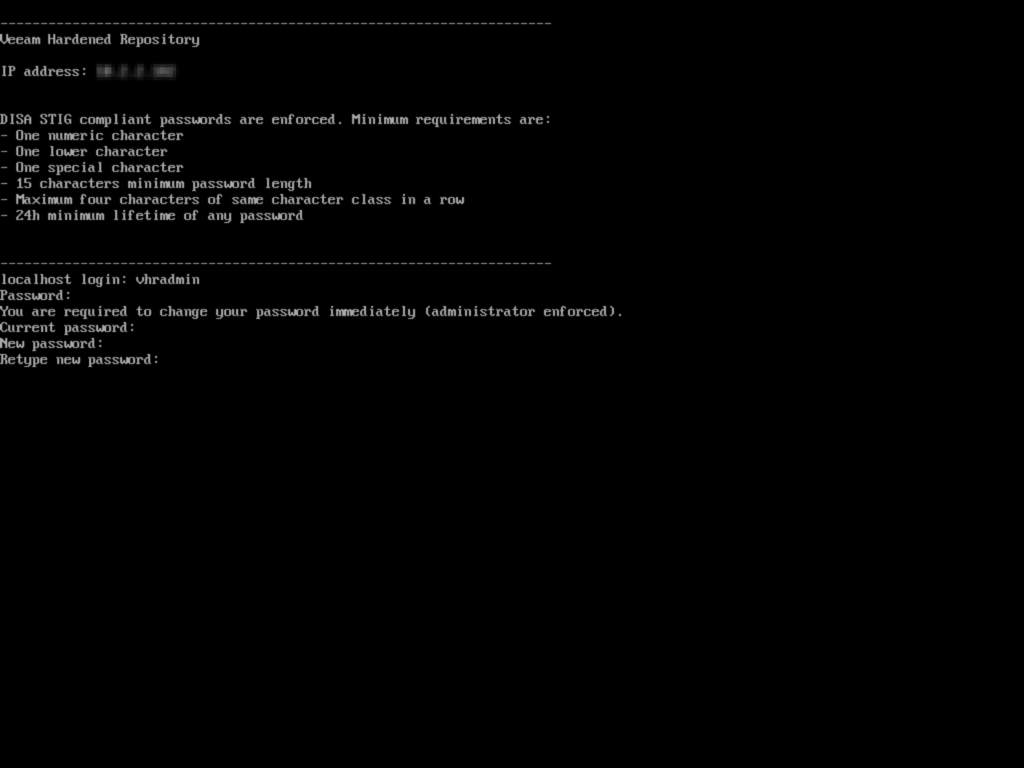
Once you’re presented with the login, you need to provide the default credentials vhradmin / vhradmin. You’ll then be forced to supply a STIG complaint password with the noted minimum requirements. First re-enter the default vhadmin password and then supply and confirm your new STIG complaint password.

Once you successfully change your password, you’ll be logged in and will be prompted to accept the typical license agreements. Once you’ve reviewed and agree with the licensing policies, you’ll be presented with the TUI. From here you can make any further adjustments as required such as changing any network settings, setting host or proxy, enabling SSH, etc. One thing that threw me is that the IP address of the appliance is not pingable. I haven’t confirmed but I assume that there is a firewall in place that is running and prevents ICMP responses. If you power off or reboot the appliance, you will get a couple of ICMP responses before the network is disconnected, so my assumption is that is when the firewall service is shut down but before the server has had an opportunity to shutdown the network interfaces.


Congratulations, your new VHR has been successfully deployed and is ready for use.
In the third and final part of this three part blog series, we’ll log into the appliance to enable SSH, configure and add our VHR to our Veeam deployment and set up and execute our first backup to our shiny new immutable repository.


Pingback: Deploying Data Immutability with the Veeam Hardened Repository ISO (Part 1 of 3) - Tech Notes & Dad Jokes
Pingback: Deploying Data Immutability with the Veeam Hardened Repository ISO (Part 3 of 3) - Tech Notes & Dad Jokes
Pingback: Deploying the Veeam Hardened Repository ISO – as a Synology Virtual Machine (Part 1) - Tech Notes & Dad Jokes